Transactions
The Transactions page tracks income and expense transactions separately from your account balances, so you can monitor day-to-day spending alongside your overall net worth.
Categories & subcategories
Section titled “Categories & subcategories”Transactions and planned transactions can optionally be tagged with a category and, within it, a more specific subcategory. Budgets require a category (but no subcategory) to define what they track.
Starter categories
Section titled “Starter categories”The first time you open the Categories page, a starter set of French banking categories and subcategories is created for you automatically — rename or delete them as you like.
Browsing and editing
Section titled “Browsing and editing”- Categories, and the subcategories within each one, are always listed alphabetically by name.
- Each category has a collapse/expand arrow to show or hide its subcategories, and every category starts collapsed.
- A color swatch next to each category’s name shows its color; click it to change. A subcategory has no color of its own – it inherits its parent’s for its own left-edge color bar.
- Double-click a name, or use its pencil (Edit) icon, to rename it in place.
- A number and progress bar next to each category or subcategory (e.g. “12 · 3”, hover for the full breakdown) show how many transactions and how many planned transactions use it, scaled relative to the busiest row – the same layout as the Tags page’s usage column.
- The ban icon next to a category’s name leaves its expenses out of the annual spending used by the financial independence report (see Reports). Use it for money that is not consumption, such as a card payment or a move to an account you do not track. Select it again to count the category. Every chart on the Transaction charts page leaves them out, as do the total boxes above them, and so does the savings rate shown there (income against the spending that counts). The budgets on the Budget page and the dashboard still count them.
Moving a subcategory
Section titled “Moving a subcategory”Use a subcategory’s “Move to category…” icon, or drag it onto another category, to re-parent it to a different category — all past and future transactions and planned transactions referencing it automatically follow it to its new category, and so do the default categories of payees that use it.
Transactions
Section titled “Transactions”Record income or expense transactions with:
- an amount, typed in your number format (see Typing amounts);
- an optional category;
- an optional description;
- a date;
- a status (see Status below);
- a linked account (required – shown as its own column in the table, followed by its institution in the picker, with the institution also available as a hover tooltip on the row).
On a phone the toolbar keeps Show filters and Select; Import, Export, Reconcile, Trash, Probable duplicates and Add transfer are in its More actions menu.
Reading the table
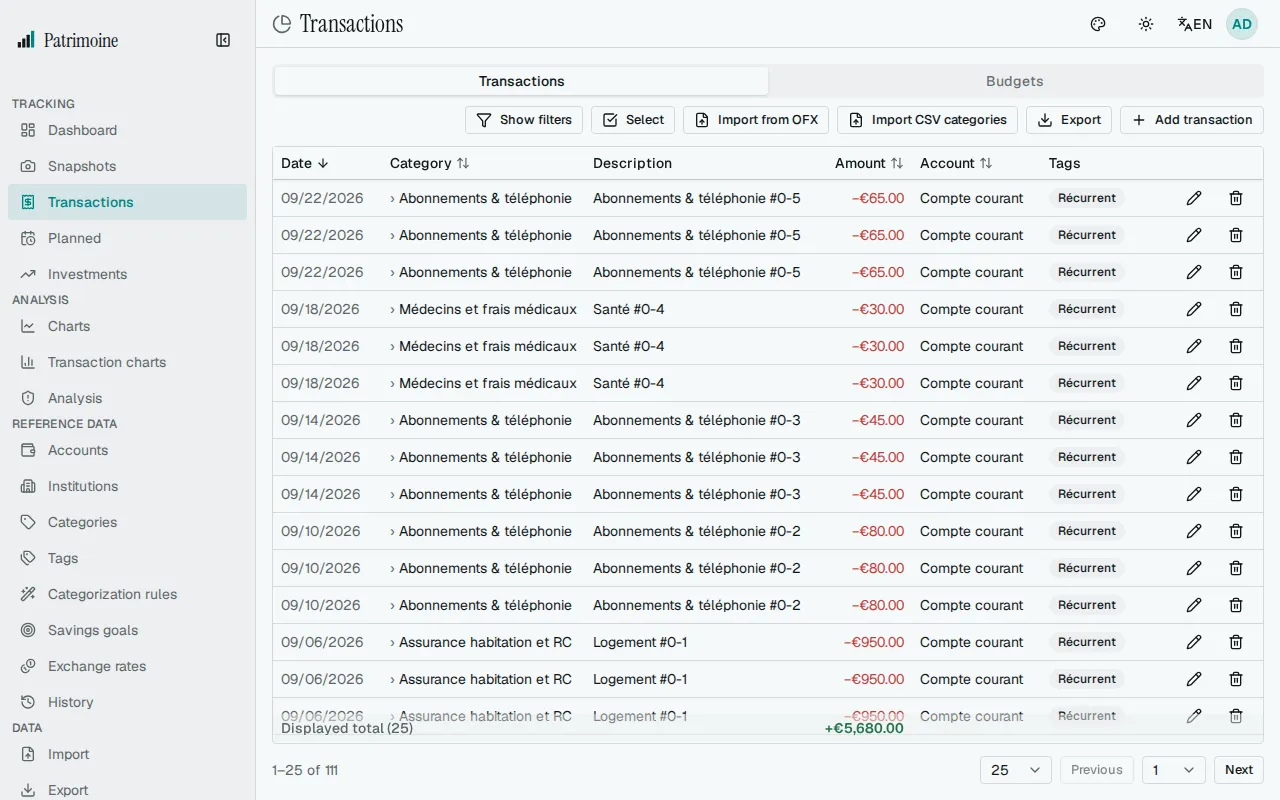
Section titled “Reading the table”- When a transaction has both a category and a subcategory, the table shows just the subcategory (e.g. “Restaurants”), prefixed with a small “›”, with the parent category (e.g. “Groceries”) available as a hover tooltip.
- When a transaction carries a suggested label from a CSV category import (Boursorama’s cleaned-up merchant name), the Description column shows that label instead, with the raw bank description available as a hover tooltip.
- Transactions with no suggested label show the raw description as before.
- When a transaction has a payee, it appears in small grey text under the description, unless it reads the same as the description (or suggested label) already shown. Transactions without a payee show nothing there. The phone card shows it the same way.
- On a screen narrower than 640 px each transaction is a card: the description and amount on the first line, then the date, category and account, then its tags (a transaction without tags has no tags line), status and actions.
- On a phone, sort with the Sort by control above the list; the arrow button reverses the order.
Status
Section titled “Status”Every transaction has a status, shown as an icon in the Status column right after Amount:
- Pending (empty circle): recorded, but not yet confirmed against your bank statement. A transaction you enter by hand starts here.
- Cleared (circle with a check mark): confirmed. A transaction created by a bank import starts here.
- Reconciled (padlock): locked by a reconcile; it can no longer be changed.
Click the circle on a pending or cleared transaction to switch it between pending and cleared. You can also pick the status in the transaction’s form, or set it for a whole selection at once with Edit selected (see Bulk edit).
Editing
Section titled “Editing”- Each transaction can be edited or deleted from the transactions table. Deleting moves it to the trash (see The trash below).
- The Payee field is optional: type to search your payees (the most used come first), pick one, or choose Create “…” to add the typed text as a new payee. The cross clears it. A transfer has no payee, so the field is not shown for one. On a new transaction, picking a payee can also fill in the category (see Payees).
- Its category or tags can also be edited directly in the table by double-clicking either cell – each change is saved immediately, with no separate save step.
- The suggested label itself can also be edited or cleared from the transaction’s edit dialog.
Locked transactions
Section titled “Locked transactions”A reconciled transaction is locked. In its edit form the amount, type, date, account and status are greyed out, with a note explaining why; its category, tags and description stay editable, and so do its category and tags directly in the table. Its delete button is disabled. If a change is refused anyway (for example from a page that was open before the reconcile), a message explains that the transaction is reconciled and nothing is saved. Undo the reconcile to unlock it.
Bulk actions work the same way: when you move a selection to the trash, reconciled transactions are skipped and a warning names the first three of them, followed by “(+n)” for the rest. A bulk edit lists every skipped transaction with its reason (see Bulk edit). Changing only the category or tags of a selection still applies to reconciled transactions.
Transfers
Section titled “Transfers”A transfer moves money between two of your own accounts. It is stored as two linked transactions, one expense on the source account and one income on the destination account, both created as pending.
- Transfers never count as income or expenses in your budgets, charts or savings rate, while account balances, the forecast and the spendable figure stay correct.
- Choose Add transfer in the toolbar of the Transactions tab (Add transaction is the page’s main button at the top, a + icon on a phone), then enter the two accounts, the date, the amount and an optional description. The description is applied to both legs. Archived accounts are not offered. Confirm with Create transfer.
- When the two accounts use different currencies, you enter two amounts: what left the source account and what arrived on the destination account. No exchange rate is stored.
- A new transfer has no category or tags; set them on each leg separately, like on any other transaction.
- Each leg shows a transfer icon before its description. Hover over it, or focus it with the keyboard, to see the other account and, across currencies, what was sent and received. A leg’s amount keeps its sign but is not shown in the green income or red expense colour.
- Editing the amount or date of one leg updates the other leg too. Between accounts in different currencies only the date follows; a new amount changes only the leg you edit. The type of a linked leg can’t be changed, and a leg can’t be moved to the account of its other leg. Category, tags and description stay separate on each leg and are never copied between them.
- Deleting one leg moves both legs to the trash. In the trash, restoring or permanently deleting either leg does the same for both.
- Unlink transfer, the unlink icon in the row’s actions, turns the two legs back into ordinary transactions. They count as income and expenses again, and their categories are not changed. It also works when the other account was deleted.
- To link two existing transactions as a transfer, select exactly two rows and choose Link as transfer in the selection bar, then confirm. They must be one expense and one income of the same amount and currency on two different accounts, and neither can be reconciled or already linked. The action stays disabled for any other selection. Their categories are not changed.
- The app also looks for likely pairs: an expense and an income of the same amount on two of your accounts, within three days of each other. When it finds some, a possible-transfers button appears above the table; it opens a list showing both legs of each pair side by side. A pair marked “Another transaction matches this one too” is worth a closer look before you link it. Nothing is ever linked on its own: press Link as transfer on a pair to link it, or Dismiss to hide it. Dismissed suggestions are remembered in this browser only, so they still show on your other devices, and Show dismissed suggestions again brings them back.
- A reconciled leg locks the transfer: neither leg’s amount or date can be changed, and the transfer can’t be linked or unlinked, until you undo the reconcile.
Splitting a transaction
Section titled “Splitting a transaction”A split divides one payment across several categories, for example a supermarket receipt that mixes groceries and household items. The transaction itself stays one row with one amount.
- Choose Split transaction, the split icon in the row’s actions, to open the Split dialog. On a transaction that is already split, the same button reads Edit split, and the “Split · N lines” badge in the Category column opens the dialog too.
- Each line has a category, an optional subcategory and an amount. Type amounts as plain figures in the transaction’s own direction: on a 100 expense, lines of 60 and 40 are both expenses. A line that goes the other way, such as the refund of one item, takes a leading minus sign.
- A split has between 2 and 20 lines. Add line starts the new line with what is still left. The remainder shows how much is not yet assigned, and Save split stays disabled until the lines add up exactly to the transaction’s amount.
- A split row shows “Split · N lines” instead of a category. Hover over the badge, or focus it with the keyboard, to list each line as category, subcategory and amount (the amounts are hidden in privacy mode). The transaction’s own category is cleared; its tags and description stay on the transaction.
- In the transaction’s edit form, the amount and the category are greyed out with a note. Description, suggested label and tags stay editable, and the Edit split link in the note opens the dialog. To change the amount, remove the split or re-balance its lines first.
- Remove split, in the dialog and after confirmation, deletes the lines and leaves the transaction without a category, so you can pick one again.
What a split changes elsewhere:
- Budgets, the category charts and the category filter count each line in its own category. Balances, the forecast and the account history keep using the transaction’s full amount.
- The category filter also matches a split transaction that has a line in that category, and the uncategorized filter leaves it out. The search box only looks at the transaction’s own category, not at its lines.
- Auto-categorization rules never change a split transaction’s category or tags (they can still set its suggested label), and the CSV category import never gives it a category.
- Bulk edit skips a split transaction when you change the category or subcategory, and lists it under its reason; the other changes still apply to it.
- A split transaction can’t be linked as a transfer.
- Reconciled transactions and transfer legs can’t be split: a reconciled transaction is locked to match its bank statement, and a transfer leg has to stay a single movement between two accounts. Undo the reconcile, or unlink the transfer, first.
Merging duplicates
Section titled “Merging duplicates”When the same payment appears twice, for example once from a bank import and once entered by hand, you can merge the two rows into one.
- Select exactly two rows and choose Merge in the selection bar, right after Link as transfer. The action stays disabled for any other selection, including “select all matching the filter”.
- The dialog shows both transactions side by side. Pick the one to keep: nothing is chosen for you, and Merge stays disabled until you do.
- The transaction you keep keeps its amount, date, account and status. Its empty category, subcategory, description, suggested label and payee are filled from the other one, and the tags of both are combined.
- The other transaction moves to the trash, so nothing is lost. Importing the same bank file again does not bring it back, and restoring it from the trash does not undo the merge: the kept transaction keeps what it took from it.
- Reconciled transactions, transfer legs and split transactions can’t be merged. The dialog lists each of them with its reason and keeps Merge disabled; undo the reconcile, unlink the transfer or remove the split first.
Probable duplicates
Section titled “Probable duplicates”After you restore a JSON backup and then import an OFX, QIF or CAMT file, or after you enter payments by hand and later import the same ones, the same payment can exist twice. Choose Probable duplicates, next to Add transfer on the Transactions page, to review them and merge several at once. This screen is only available on the web.
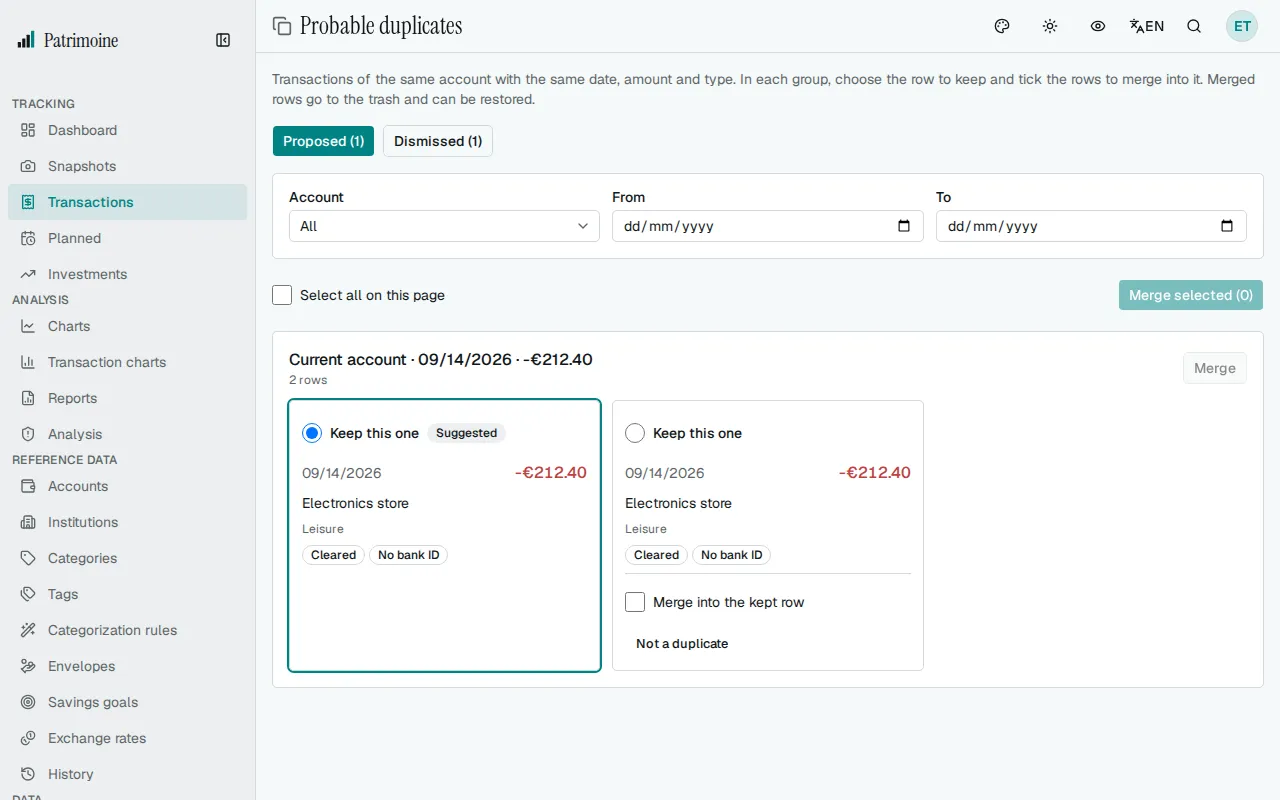
- The button shows how many groups of probable duplicates were found, for example Probable duplicates (3), and the number goes down as you merge them. With none, the button carries no number.
- A group of probable duplicates is made of the live transactions of one account that share the same date, the same signed amount and the same type. Reconciled transactions, transfer legs and split transactions are never offered, because they can’t be merged. A group needs at least one transaction without a bank ID, for example one restored from a backup or entered by hand: transactions that each carry a different bank ID are distinct bank transactions and are never offered as duplicates. In a group, the transactions that do have a bank ID are still shown, as candidates to merge into.
- Filter by Account, From and To. The list shows 50 groups per page by default; the page-size selector next to Previous/Next switches to 100 or 250.
- Each group shows its rows side by side: date, amount, description, suggested label, category > subcategory, tags, status and, where they apply, the Has a bank ID or No bank ID badge and the Planned badge.
- One row is pre-selected as the one to keep and carries the Suggested badge: preferably the one that has a bank ID, then one with a category, then one with a description, then the oldest. Pick another with its radio button if you prefer.
- Every other row has a Merge into the kept row checkbox, unticked by default: two identical purchases on the same day can be legitimate, so nothing is merged unless you tick it.
- Choose Merge on a group to merge its ticked rows, or tick rows in several groups and choose Merge selected (n). Select all on this page ticks every merge checkbox on the page.
- A dialog asks you to confirm: the merged rows go to the trash, where you can restore them, and the kept row is filled in from the merged ones (only its empty fields are filled, and tags are combined), as when you merge two rows.
- A message says how many transactions were merged. Rows that were not merged are listed with their reason: reconciled, part of a transfer or split; same transaction as the kept row; no longer exists (already merged or deleted); or simply not merged.
- When there is nothing to review, the page shows No probable duplicates.
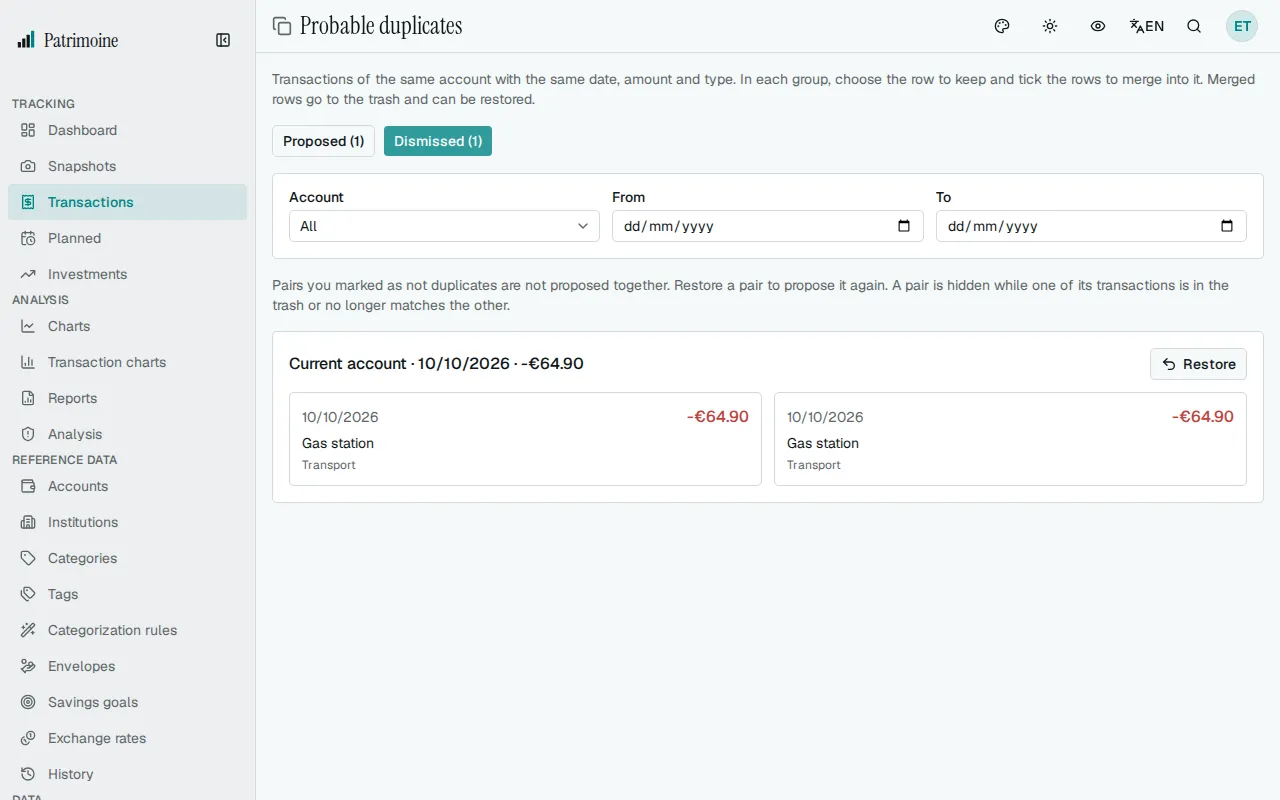
- A row that only looks like the others is not a duplicate: choose Not a duplicate on it. The row leaves its group and Patrimoine remembers that it is not a duplicate of the other rows shown, so they are not proposed together again. A group left with fewer than two rows disappears. Nothing is merged and no transaction changes.
- Dismissed (n), next to Proposed (n) at the top of the page, lists the pairs you marked this way, side by side, with the date, amount, description and category. Choose Restore on a pair to propose it again. The list follows the same Account, From and To filters and shows 50 pairs per page by default, with the same page-size selector (100 or 250).
- A dismissed pair is hidden, not forgotten, while one of its transactions is in the trash or no longer has the same date, amount and type as the other; it comes back to the list when they match again. Deleting a transaction for good removes its dismissals. A transaction added later with the same date, amount and type is still proposed together with the rows of a dismissed pair.
Applying a category to similar transactions
Section titled “Applying a category to similar transactions”After you categorize a transaction, you can give the same category to the similar transactions of the same payee in one go. This is only available on the web.
- Two transactions are similar when they have the same payee and the same type (income or expense) and an amount within about 15% of the group’s typical amount (with a minimum margin of 2), whatever the account and the date. A transaction without a payee never belongs to a group.
- Transactions in the trash, transfers, split transactions, reconciled transactions and the transaction you start from are left out. By default, only transactions without a category are listed.
- The Apply category to similar transactions button, among the row’s actions on a categorized transaction that has a payee, opens the dialog. It is not shown on transfers, split or reconciled transactions, nor in selection mode.
- Right after you categorize a single transaction from the table or from the edit form, a message saying how many similar transactions of the same payee can get the same category offers Apply to similar, which opens the same dialog. It only appears when similar transactions exist, never after creating a transaction or after a bulk edit, and it shows next to the offer to create a rule when Offer to create a rule when I categorize is on.
- The dialog starts with the transaction’s own category, which you can change, and lists the similar transactions with their date, account and amount. Every row starts ticked: untick the ones that should keep their category. The header counts the selected rows, and Select all similar transactions ticks or unticks them all.
- Apply to N transactions gives the category to the ticked transactions, closes the dialog and shows a message saying how many transactions were categorized and as which category.
- It works whether or not Suggest a category from the payee is on in Settings: it is a choice you make each time.
- Include already categorized transactions, unticked by default, also lists the transactions that already have a category, with their current category (Currently: …). Ticking it reloads the list and ticks every row again, so you can recategorize them.
- When a group has more than 250 transactions, a notice says so: only the first 250 are listed, and Select all similar transactions covers those only. Apply them, then reopen the dialog to continue with the rest.
- If some transactions could not be changed, for example because they were split in the meantime, the message adds how many were skipped.
- The message stays for 10 seconds with an Undo button. Undo restores the previous category of each changed transaction, leaves the skipped ones alone, and overwrites whatever those transactions hold at that moment.
Filters
Section titled “Filters”Filters live behind a collapsible “Show filters” toggle next to the table’s other action buttons. Once expanded, you get:
- a combined search box that matches description, category/subcategory, account name/institution, tag names, and amount (a negative number like “-45.50” matches expenses, a positive one matches income);
- a category/subcategory filter (a searchable picker with checkboxes – tick several to match any of them; ticking a category includes its subcategories), including a “— Uncategorized —” option to find transactions with no category at all;
- a tags filter (also multi-select), with a separate “No tags” checkbox to find transactions carrying no tags at all;
- a payee filter: pick one payee by name (the list searches as you type) to see only its transactions. While it is set, transactions without a payee are not shown. The x in the field, or Clear filters, removes it;
- separate filters for account, type, an amount range (min/max), and a date range. The amount range is read in your number format: in English 1,500 is fifteen hundred; in German 1,500 is one and a half and 1.500 is fifteen hundred.
Saved filters
Section titled “Saved filters”The Saved filters button, at the top of the filters, keeps the filters you use often so you can bring them back in one click.
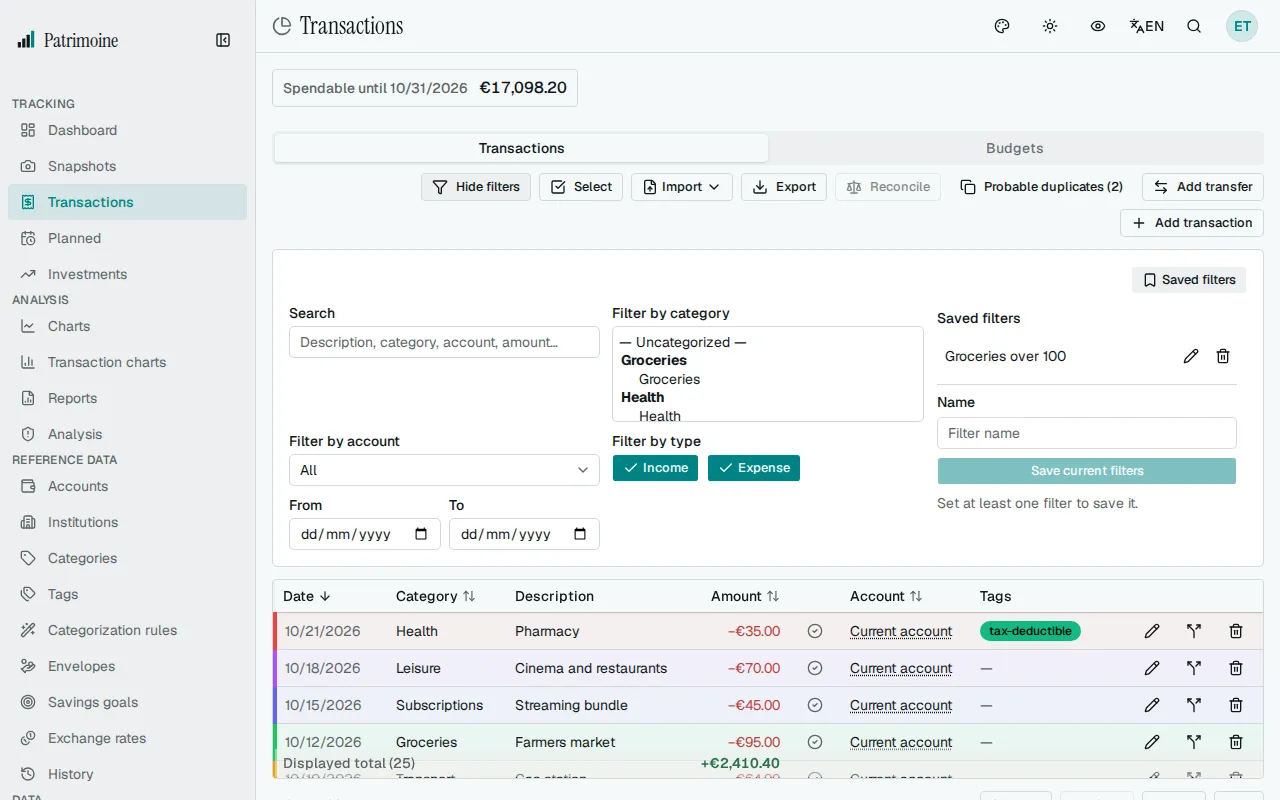
- Save current filters stores everything set in the filters (search, categories, subcategories, tags, payee, accounts, type, amount range, date range, and the uncategorized and no-tag options) under a name. It stays disabled until at least one filter is set. A hand-picked selection of rows is not saved.
- Names are unique: saving a name you already use is refused. You can keep up to 100 saved filters.
- Click a saved filter to apply it. It replaces every filter currently set, the search included, rather than adding to them.
- Rename or delete a saved filter in place with the icons on its row. Deleting asks for confirmation.
- A saved filter remembers categories, subcategories, tags, the payee and accounts by identity. If one of them was deleted since, that part is simply left out when you apply the filter, and the rest still applies. A notice tells you how many criteria were left out. If the lists of categories, tags or accounts have not finished loading, or the saved payee cannot be looked up, the filter is not applied and you are asked to try again in a moment, so it never ends up wider than the one you saved. A filter that points at several accounts keeps only the first one that still exists, because the transactions page filters on one account at a time.
- Saved filters are part of your backup.
Selection, totals, and export
Section titled “Selection, totals, and export”- Choose Select at the top of the page (in the toolbar on a phone) to switch to selection mode, where Select all and Cancel replace it. Rows can then be selected via checkboxes to move them to the trash in bulk, including selecting every transaction matching the current filter (not just the visible page) before confirming a single batch move.
- Moving to the trash, single or bulk, requires confirmation.
- The number of transactions shown per page (50, 100, or 250) is adjustable via the selector next to the Previous/Next buttons.
- A total row at the bottom of the table shows the signed sum of any selected transactions; failing that, of every transaction matching the active filter (not just the visible page); failing that, of the transactions currently displayed.
- An “Export” button next to the other action buttons downloads every transaction matching the active filter as CSV, ODS, or XLSX. The export ends with a Status column (
pending,clearedorreconciled), a Transfer group column, which holds the same identifier on both legs of a transfer and is empty for other transactions, a Split column, and a Payee column holding the payee name, which is empty when the transaction has none. A split transaction is exported as one row per line, each with the line’s category, subcategory and amount and the split position in the Split column (1/3,2/3,3/3); the other columns repeat on every row. The Split column is empty for ordinary transactions, and the payee is repeated on every row. The file can therefore have more rows than the number of transactions exported, while the amounts still add up.
The trash
Section titled “The trash”Deleting a transaction, or a selection of transactions, moves it to the trash instead of removing it: it disappears from the table, the totals and the account balances, but nothing is lost yet.
- When the trash holds at least one transaction, a Trash (n) button appears next to Export. It opens the list of deleted transactions, 50 per page by default (the page-size selector offers 100 or 250), each with its account, amount and deletion date.
- Restore puts a transaction back where it was. If its account was deleted in the meantime, it comes back without an account and a warning reminds you to assign one; if its category or subcategory no longer exists, those fields are cleared. If an identical transaction already exists, the restore is refused.
- Delete permanently removes one transaction for good, after confirmation. This cannot be undone.
- Empty trash permanently deletes everything in the trash, after confirmation. This cannot be undone.
Reconciling an account
Section titled “Reconciling an account”What it is for. Reconciling checks that what Patrimoine shows for one account matches the closing balance printed on your bank statement. When the two agree, you know every payment of that period was entered once and with the right amount. Patrimoine then locks those transactions, so a later edit cannot silently break a balance you have already checked. Do it once a month, or whenever you receive a statement.
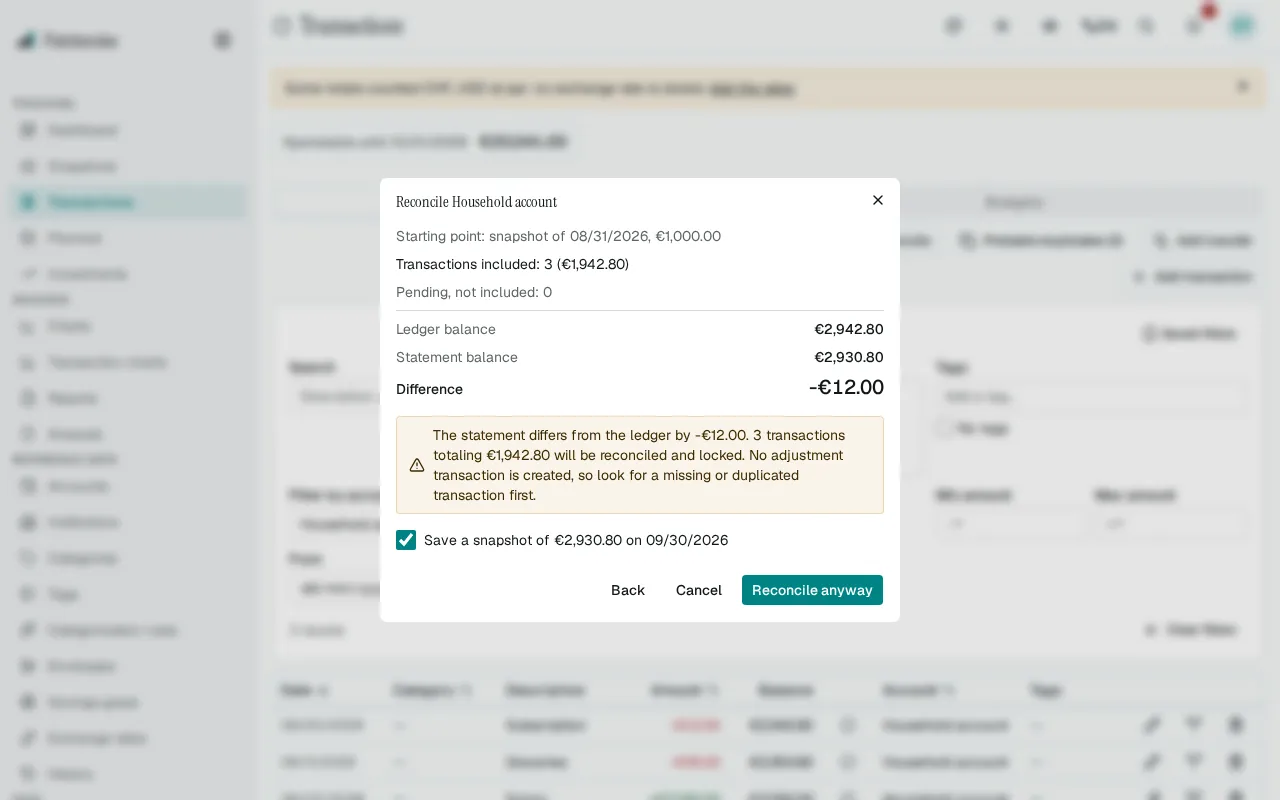
Before you start. Reconciling only counts cleared transactions (see Status above):
- Compare your statement line by line with the table and click the circle of each transaction that appears on it, so it becomes cleared. Transactions from a bank import are already cleared.
- Leave pending the ones that are not on the statement yet. They are never included or locked, and they stay editable.
How to reconcile
- Filter the table to a single account. The Reconcile button in the toolbar is only available when exactly one account is filtered.
- Enter the statement date (today by default) and the closing balance printed on the statement, with a minus sign if the account is overdrawn, then choose Continue. The date must be after the date of the account’s previous reconcile.
- Read the review (below), then choose Reconcile account.
How the check works. Patrimoine starts from a balance you can trust, adds the cleared transactions since then, and compares the result with your statement:
- Starting point: the account’s latest reconcile or, failing that, its latest snapshot dated before the statement date. If it has neither, you are asked for its opening balance, the balance before its first transaction.
- Transactions included: the cleared transactions after the starting point, up to and including the statement date. Pending transactions are never included, and cleared transactions dated before the starting point are not included either: a line tells you how many there are.
- Ledger balance: the starting point plus the sum of the included transactions. It is the balance Patrimoine expects the statement to show.
- Difference: the statement balance minus the ledger balance. When it is zero, the ledger matches the statement.
Example. The account’s starting point is its snapshot of 31 August, 1,000.00. In September three transactions are cleared: a salary of +2,000.00, groceries of -45.20 and a subscription of -12.00. The ledger balance is 1,000.00 + 2,000.00 - 45.20 - 12.00 = 2,942.80. If the statement closes at 2,942.80, the difference is zero and you can reconcile. If it closes at 2,930.80, the difference is -12.00: the bank took 12.00 that Patrimoine does not know about.
When the difference is not zero. A warning shows the gap and the button reads Reconcile anyway. No adjustment transaction is ever created, so find the cause first. Usual causes:
- A payment on the statement is missing from the account: add it, as cleared.
- A payment was entered twice: use Probable duplicates to merge it.
- A payment that is on the statement is still pending: click its circle to clear it.
- An amount, a date or the statement date is wrong, or the opening balance you entered is.
Then choose Continue again to recalculate. You can still Reconcile anyway, and the gap stays visible in the review of your next reconcile.
What reconciling does.
- It locks every included transaction (see Locked transactions above): amount, type, date, account, status and deletion can no longer be changed, while category, tags and description stay editable.
- By default it also saves a snapshot of the statement balance on the statement date. If a different snapshot already exists on that date, tick the box confirming its replacement, or untick the snapshot option. A negative balance cannot be stored in a snapshot, so none is saved; the reconcile itself still goes through.
- Liability accounts cannot be reconciled.
Undoing a reconcile. Open Reconcile on the same account: when it has one, the first step shows the latest reconcile with an Undo last reconcile button, after confirmation. Only the latest reconcile can be undone. Its transactions go back to cleared and editable, and the snapshot it saved is removed unless you edited it since, in which case it is kept and a message says so.
Running balance and snapshot checks
Section titled “Running balance and snapshot checks”When the table is filtered to a single account and sorted by date, in either direction, a Balance column appears right after Amount. It shows the account’s balance after each transaction, in the account’s own currency.
- The balance starts from the account’s latest snapshot and is carried forward and back through its transactions, pending ones included. A row shows the same balance whatever other filters are active, because it always reflects the whole account.
- If the account has no snapshot, there is nothing to start from: the column is not shown and a hint under the toolbar asks you to add a snapshot. With no account filter, or another sort order, nothing is shown either.
- When an older snapshot disagrees with the ledger, a warning triangle appears next to the balance of the last transaction on or before that snapshot’s date. Hover over it, or focus it with the keyboard, to read the snapshot date and the signed gap. It is only a signal: look for a missing or duplicated transaction around that date. A snapshot that agrees with the ledger shows no marker, and neither does one dated before the account’s first transaction.
Importing transactions
Section titled “Importing transactions”Instead of entering transactions by hand, use the Import menu in the toolbar. It has three items: Bank file (OFX, QFX, QIF, CAMT) and CSV with column mapping, which create transactions, and Import CSV categories, which only enriches existing ones (see Import categories from CSV below).
Imported transactions arrive as cleared and uncategorized, unless an auto-categorization rule matches or the payee has a default or usual category (see Rules and limits below).
Bank files (OFX, QFX, QIF, CAMT)
Section titled “Bank files (OFX, QFX, QIF, CAMT)”Choose Bank file (OFX, QFX, QIF, CAMT) to upload a bank statement exported as an .ofx, .qfx, .qif or .xml (CAMT.052 or CAMT.053) file. A QFX file is read exactly like an OFX file.
- The first time you import a given bank account, you’re prompted to pick the matching Patrimoine account or create a new one — this link is remembered, so later imports of the same account skip that step.
- When a bank account is already linked, it is recognized and proposed by default, and the preview shows it with a Change button. Choosing another account moves the link: the previous account is no longer recognized automatically, and an account that was linked to another bank account gets the new one instead (it will be asked about again at the next import). You are warned about both, and asked to confirm before anything changes. Transactions already imported on the previous account stay there and are not seen as duplicates on the new one. You can also view, correct or clear an account’s bank ID from its edit form.
- If a file contains more than one bank account, each one is detected automatically and resolved (matched, picked, or created) independently before importing.
- Posted dates are taken as written in the file: they are never shifted to another time zone.
- The preview has a Payee column with the payee each row would get. A payee the import would create is marked New, and a line above the table says how many will be created. A QIF file’s preview shows the same.
A QIF file has no bank account identifier, so the app always asks which account its transactions belong to, and nothing is linked to that account: the import never changes an account’s bank ID. QIF files don’t say how dates and numbers are written either, so a QIF file settings block appears above the account choice and the preview:
- Date order is day-month-year, month-day-year or year-month-day. Number format is one of 1,234.56, 1.234,56, 1 234,56, 1234.56 or 1234,56. Both start from your own date format and number format settings.
- Under each date, the preview shows the text it was read from, so a wrong order is easy to spot. When a file’s dates can be read two ways, such as 03/04/2026, a hint says so.
- Changing either setting reads the file again after a moment and refreshes the preview in place, keeping the account you chose.
- Entries that cannot be read are skipped, and a line under the preview says how many.
- A QIF file of investment transactions, or one holding transactions of several accounts, is refused with a message; export one bank, cash or credit card account at a time.
A CAMT file (a CAMT.052 intraday report or a CAMT.053 statement, saved as .xml by many European banks) is read like an OFX file, with these differences:
- The bank account is recognized by its IBAN, stored without spaces and in capitals. The first time, you pick the matching Patrimoine account; the IBAN is then saved as that account’s bank ID, and later imports skip the question. If you typed an account’s bank ID by hand with spaces or lower-case letters, the first CAMT import asks for the account again, and picking it saves the IBAN in the stored form.
- Only booked entries are imported. Pending entries and balances are ignored.
- A batch payment becomes one row per payment when the bank lists each payment’s amount and those amounts add up to the batch; otherwise it stays one row. Credits are income and debits are expenses, in the direction the bank booked them, reversals included. Entries of zero amount are skipped.
- An entry is dated by its booking date, or by its value date when the bank gives no booking date.
- The description is the payment reference (remittance information), otherwise the name of the other party, otherwise the bank’s additional information.
- A file that contains statements for several accounts is resolved account by account, like an OFX file. Several statements of the same account and currency in one file are shown together as one account; statements of the same account in different currencies stay separate.
- An entry in another currency than its statement, and an entry that cannot be read (for example an unreadable amount or date), is not imported; the preview shows how many entries were skipped.
- A file with more than 100 statements is refused.
- A file that declares a DOCTYPE or entities, is not valid XML, or is not a CAMT.052 or CAMT.053 statement is refused with a message. Download a fresh copy from your bank.
CSV with column mapping
Section titled “CSV with column mapping”Choose CSV with column mapping to import a CSV export (.csv, .tsv or .txt) from any bank. Nothing is imported until you have mapped the file’s columns and checked the preview.
- Choose the account the transactions belong to (or create a new one), then choose the file.
- Under File format, pick a Mapping: the mapping saved for the account if it has one, Boursorama (fills in the mapping for a Boursorama export; changing any field turns it into a Custom mapping), or Custom. Then check the Encoding and Delimiter, which are detected automatically (switch the encoding to Windows-1252 when accented characters look wrong), the Rows to skip at the top when the bank adds title lines above the table, and The first row is a column header.
- Under Columns, choose the Date column and its Date format (suggested from the first value), then the amount: either one signed column (negative is an expense) or two columns, Money in column and Money out column. Choose the Number format, and turn on Reverse the sign if the bank exports expenses as positive numbers. Then choose the Description column and, optionally, an Extra description column (optional), which is added after the description, and a Reference column (optional).
- The preview updates a moment after each change. It counts the rows ready to import, the duplicates and the rows with an error (an invalid date or amount), and lists the first 100 rows with a Duplicate badge or the reason a row is skipped; every row is checked and imported, not just those shown. Tick Only show rows with a problem to hide the rest. The preview also shows each row’s payee, marks the ones the import would create as New, and says how many will be created.
- Choose the button that reads “Import N transactions”, where N is the number of ready rows. Duplicates and rows with an error are skipped, and the summary counts them.
A CSV file is limited to 10 MB, 20,000 rows and 1,000 columns; a larger file is refused with a message, so split it and import the parts.
The “Remember this mapping” checkbox is on by default: the mapping is saved on the account, and the next import for that account starts from it. If a column of the saved mapping is missing from a file, a notice says so and you can adjust the columns, or choose Start from scratch. Saving a new mapping replaces the previous one.
Duplicates
Section titled “Duplicates”Re-importing a file, or one covering overlapping dates, never creates a transaction twice.
- OFX and QFX files: a transaction is recognized by the bank’s own transaction ID for that account.
- CAMT files: a transaction is recognized by the bank’s own entry reference when it has one and no other transaction in the file shares it, otherwise (including when the bank repeats a reference) by its date, amount and description.
- CSV and QIF files have no such ID, so a row is recognized by its date, amount, description and reference (the check number for QIF). The extra description column plays no part, so adding or removing it does not change what counts as a duplicate. Two identical rows in the same file are both imported and kept apart, and a later export that overlaps or reorders the rows is still recognized.
- A transaction in the trash still counts as imported, so importing the file again does not re-create it. Delete it permanently first if you want it back.
- Each format is matched only against itself: an OFX file and a CSV file of the same account are not matched with each other (nor is a QIF or CAMT file with either), so importing the same transactions in two formats creates them twice. A QFX file counts as OFX.
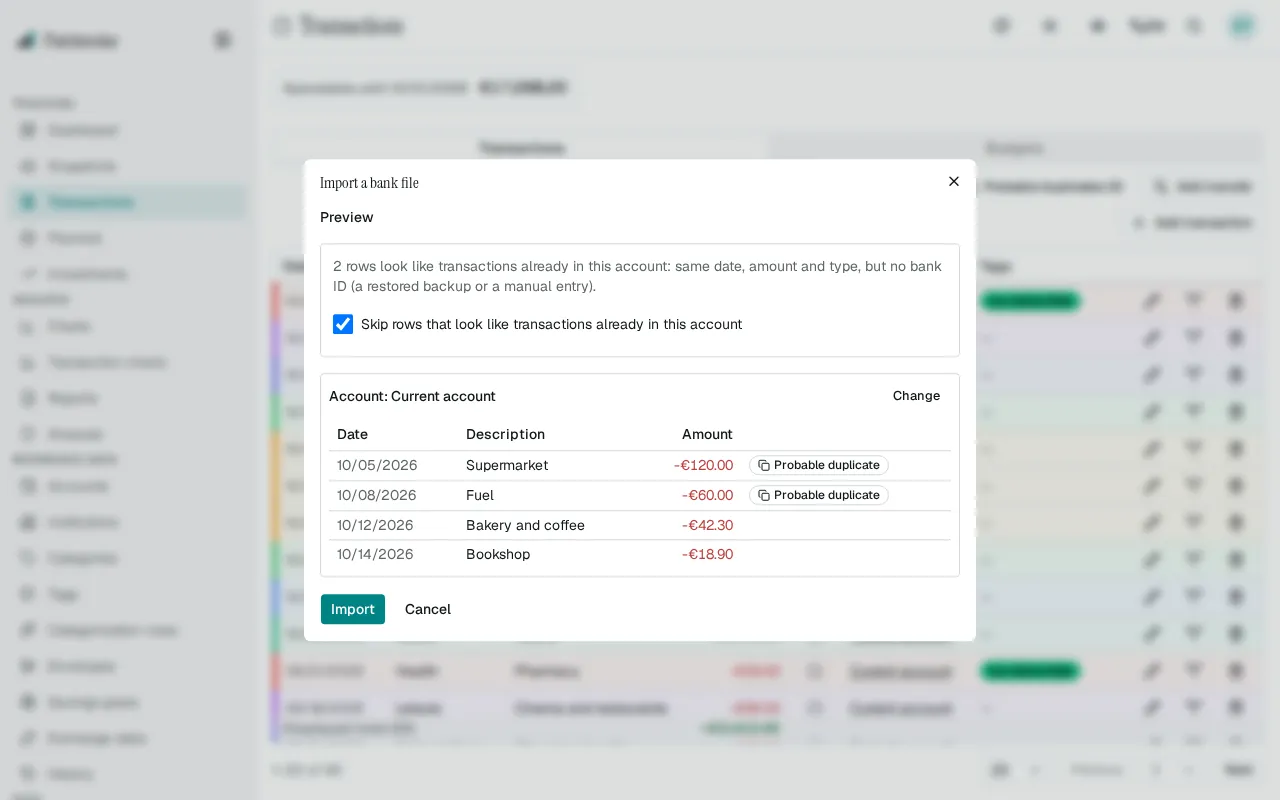
- Probable duplicates: in the preview of an OFX, QFX, QIF or CAMT file, a row is flagged Probable duplicate when the target account already holds a transaction with the same date, amount and type that has no bank ID, for example one from a restored JSON backup or entered by hand. A notice gives the count, with the Skip rows that look like transactions already in this account checkbox, ticked by default. Skipped rows are counted in Duplicates skipped in the summary; untick the box to import them anyway. Each stored transaction covers at most one incoming row, so two identical purchases in the file still import if only one stored transaction matches. The match is computed again on the server when you import. Rows already known by their bank ID are skipped as duplicates, as before. In the Android app the import preview shows the same notice, with a Skip probable duplicates switch that is on by default.
Rules and limits
Section titled “Rules and limits”- Every imported transaction goes through your auto-categorization rules (see Auto-categorization rules below). A rule whose regular expression takes too long is skipped for the rest of that import; the summary lists it, with a Review rules link.
- After the rules, a row still without a category takes the default category of its payee or, when it has none, the payee’s usual category from your history (see Payees); it never replaces a category. The import summary adds a Categorized from payee line with the number of rows that took their category from the payee, shown only when at least one did.
- A file is limited to 10 MB and 20,000 rows (entries for QIF, transactions for CAMT). A larger file is refused with a message; split it and import the parts.
For bulk balance-history import instead of individual transactions, see Import/Export.
Transactions can be labeled with one or more colored tags for lightweight grouping beyond categories — for example marking recurring merchants or trip-related spending.
Managing tags
Section titled “Managing tags”Manage tags (rename or delete) from the dedicated Tags page, reachable from the navigation menu. Each row shows:
- a color swatch;
- a usage count (number and bar, scaled relative to the busiest tag) with a left-edge color border matching its swatch;
- always-visible Edit/Delete icons.
This is the same layout as the Categories page. A tag’s name can also be renamed by double-clicking it directly, as an alternative to the edit icon.
How tags are applied
Section titled “How tags are applied”Tags are added additively everywhere in the app — importing a CSV, editing multiple transactions at once, or a planned transaction firing.
Merging tags
Section titled “Merging tags”To clean up duplicate or similar tags (e.g. “Uber” and “UBER”), select two or more from the Tags page and choose Merge — pick which tag survives, and every transaction and planned transaction using the others is moved onto it before they’re deleted.
Import categories from CSV
Section titled “Import categories from CSV”Choose Import CSV categories in the Import menu to enrich already-imported transactions with categories, subcategories, and tags parsed from a Boursorama CSV export.
- Unlike the other imports, this never creates new transactions — it only matches CSV rows to transactions that already exist (by account, date, description, and amount) and updates them.
- A transaction that already has a category keeps both its category and subcategory untouched, even if only the subcategory is blank — category (and, with it, subcategory) are only filled in on a transaction that has no category at all yet.
- Tags (from the CSV’s own tags column) are always added regardless.
- The CSV’s suggested label (Boursorama’s cleaned-up merchant name) is saved and shown in place of the raw description in the transactions table, with the raw description available as a hover tooltip.
- A re-run with an updated CSV overwrites a previously saved suggested label.
Review the preview — matched, already-categorized, and unmatched rows, plus a count of any new categories, subcategories, or tags that will be created — before committing.
- Bank-file and CSV imports create transactions from the file, automatically skipping any that were already imported for that account (see Duplicates above).
- CSV category import never creates transactions – it only matches CSV rows to ones that already exist, by account, date, description, and amount, then fills in category, subcategory, and tags.
Bulk edit
Section titled “Bulk edit”Select multiple transactions using the checkboxes in selection mode, then use Edit selected to change their category, subcategory, description, suggested label, tags, date, account and/or status in one action – for example, re-categorizing 12 miscategorized card payments as “Groceries › Restaurants” in one go.
- Category and subcategory are picked from a single search field (type to filter the list, or leave it empty on focus to browse the full list; matching a category also reveals all of its subcategories).
- A picked category or subcategory always overwrites the selected transactions’ existing values; leaving that field untouched leaves every selected transaction’s category/subcategory exactly as it was.
- The same search field replaces the category/subcategory picker on the single-transaction edit form.
- Description and suggested label replace the text of every selected transaction. Leave them empty to keep each transaction’s own text – an empty box never clears anything.
- Payee sets the payee of every selected transaction. Leave it empty to keep each transaction’s own payee – a bulk edit never clears a payee. Transfer legs are skipped for the payee, since a transfer has none, and they are listed under their reason.
- Tags can be added or removed. Add tags keeps each transaction’s existing tags and adds the ones you pick; Remove tags takes the ones you pick off every selected transaction that has them. A tag can’t be both added and removed.
- When you only change tags, the message after you apply says what actually happened: “Tag added to 2 transactions”, “Tag removed from 3 transactions”, or a warning when nothing changed – “None of the 3 selected transactions had the tag to remove” or “The 3 selected transactions already have the tag”. The transactions are still counted as updated; they simply had nothing to change. If you expected a change, check that you picked the tag in the right field: Add tags and Remove tags are two separate fields. When the same edit also changes other fields, the message only gives the number of updated transactions.
- Date, account and status sit under Date, account and status. Leave a field empty or on Don’t change to keep each transaction’s own value. The status can be set to Pending or Cleared, and archived accounts are not offered.
- Reconciled transactions and transfer legs are skipped for date, account and status, but they still receive the category, subcategory, tags, description and suggested label.
- Moving transactions to an account in another currency, or to an account that already holds a transaction with the same bank reference, skips those transactions.
- After you apply, if any transaction was skipped, the dialog stays open and lists each one under its reason (reconciled, part of a transfer, different currency, duplicate on the target account), so you can see what to fix. Choose Close when you are done.
- Moving a selection to the trash skips a transfer leg unless both of its legs are selected.
Category budgets
Section titled “Category budgets”On the Budgets tab, set a monthly spending limit per category – for example a €300 limit on “Restaurants”.
- Each budget card shows the amount spent so far this month against the limit, with a progress bar that turns red once you go over.
- You can also scope a budget to one specific subcategory instead of the whole category – e.g. limit “Restaurants · Delivery” without capping the rest of your restaurant spending.
- To change a budget, use the pencil (Edit budget) icon on its card. The dialog lets you change the category (and subcategory), the default monthly limit and the rollover setting; nothing else is editable, since budgets are monthly only. A limit for one month only is set on the Months tab (see Limits for specific months).
- To delete a budget, use the trash icon on its card and confirm; the transactions in that category are kept.
- A new default limit applies to every month that has no limit of its own, including past ones. Switching rollover on or off also recalculates the carried-over amounts of past months, not just from now on; the dialog warns you when you change it.
- Only one budget can exist for a given category (or subcategory): saving a change that would duplicate another budget is refused with a message, and the dialog stays open.
- Each expense transaction in a category adds to that category’s spend for the month, compared against its monthly limit.
- Enable rollover on a budget and any unused amount from a month carries forward as credit to the next month’s limit; an over-budget month never creates a debt that reduces a future limit.
- Each budget card and the Budget vs Actual chart use the limit of the month shown, including a limit set for that month only (see Limits for specific months). With rollover on, the card shows the carried credit even in a month without any transaction.
Under its title, the Transactions page shows what you can still spend until the end of the current month, whichever month the budgets list shows. Select it to open the same breakdown as the spendable card on the Dashboard, which also explains how the figure is computed.
Limits for specific months
Section titled “Limits for specific months”The Months tab shows each budget over six months, ending at the month the page is showing, so you can plan a month that costs more or less than usual.
- Each budget has a card with one tile per month: the month’s limit, how much was Spent (or how much you are Over by) and, for budgets with rollover, the amount Carried over from earlier months.
- Use Previous 6 months and Next 6 months to move the window in either direction. Future months can be planned too.
- Select a month’s limit to give that month its own limit: type an amount (0 is allowed) and choose Save limit. A month with its own limit shows a Custom badge. Choose Reset to default in the same window to go back to the budget’s default limit.
- Months before the budget was created show a dash and cannot be changed.
- With rollover on, each month’s own limit is what carries forward: a month with a lower limit passes less credit on to the next one.
- Budget alerts and the spendable figure use the limit of the month they concern. In a month whose limit is 0, the first spending triggers the budget alert and the budget card shows it as over.
- Choose Fill month to fill the last month shown for all active budgets at once. Copy previous month copies the previous month’s own limit; if that month has no limit of its own, the month is left alone, or, with Replace custom limits already set for this month checked, its own limit is removed so it follows the default again. Average of previous months sets each budget’s limit to its average spending over the months that have transactions among the last 3, 6 or 12 months before it. The current month never counts, a budget with no spending in that period is left alone, and when none of those months has any transaction, nothing changes and a message says so. Months that already have their own limit are skipped unless Replace custom limits already set for this month is checked. The result is ordinary month limits that you can edit afterwards.
- The Android app still shows the default limit for now.
Auto-categorization rules
Section titled “Auto-categorization rules”Rules that set a category, subcategory, tags or a suggested label automatically are described in Categorization rules.
Due-date bills and recurring payments are documented separately in Planned Transactions.
Transaction charts
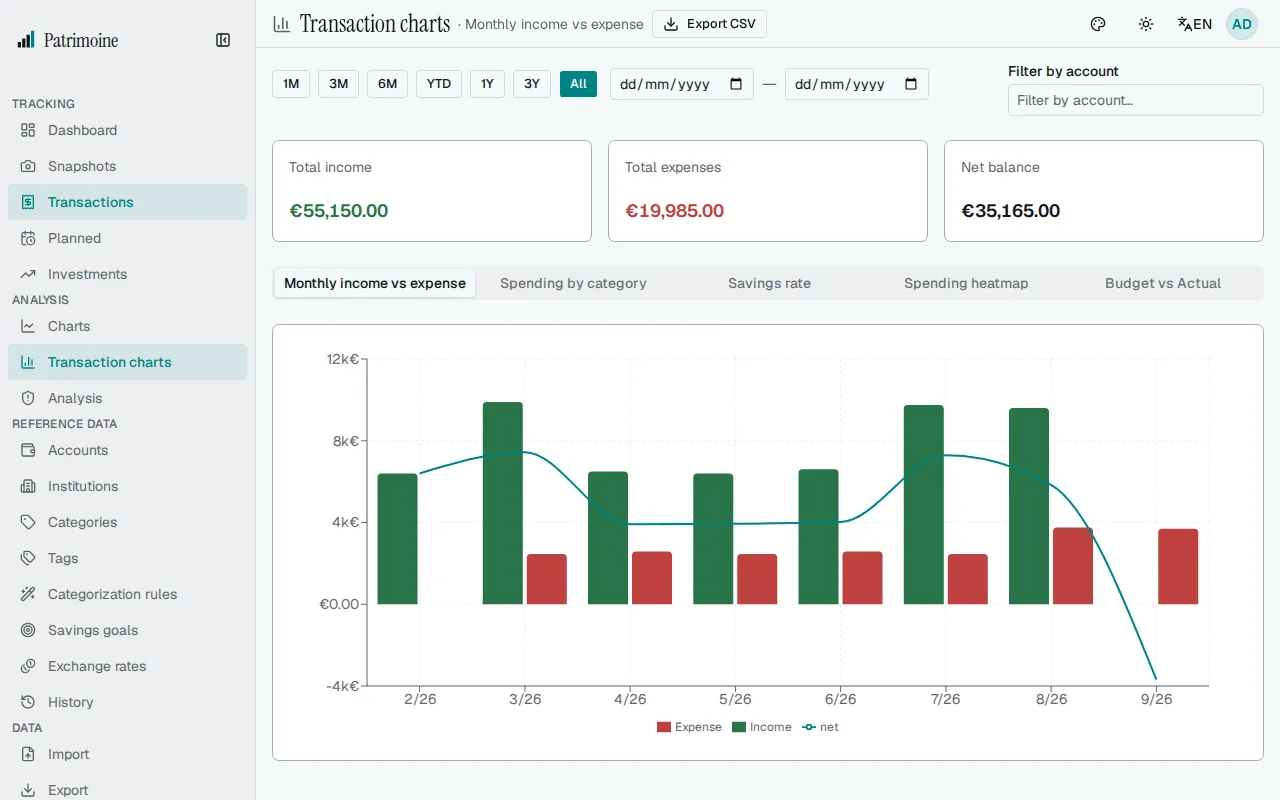
Section titled “Transaction charts”The transaction charts live on a dedicated ‘Transaction charts’ page, reachable from the navigation menu next to the Transactions page. They cover:
- monthly income vs expense;
- category spending;
- savings-rate trend;
- spending heatmap;
- a budget-vs-actual comparison, once you have set up at least one budget;
- category trends, one small line per category;
- a burn-down of one budget over the current month;
- a comparison of two periods, category by category.
The Spending heatmap shows how much you spend by day of the week and by day of the month, with darker cells for higher totals. Only expenses are counted.
Category trends draws one small card per category, the twelve that spent the most in the period, largest first. Each card shows the last month’s amount, the change since the month before, the monthly average and a line of the month-by-month spending. Every line has its own scale, so read the line for the shape and the figures for the size. It follows the period and account filters above.
Budget burn-down follows one budget through the current month: the line of what you have spent day by day, a dashed line for the even pace to the limit and a red dashed line for the limit. Above it, a sentence says how much is left or over and, once something is spent, where the month ends at today’s pace. Pick the budget in the list, which starts with the one closest to its limit. It uses the limit of the month, as the Budget page does, and ignores the period and account filters.
The selected tab is kept in the address as ?tab=, for example ?tab=savings-rate, so you can bookmark a tab or share a link to it. An unknown value opens the first tab.
The total boxes above the charts (total income, total expenses, net balance) follow the period and account filters. On the Compare periods and Budget burn-down tabs the filters drive the boxes only: the comparison has its own periods and the burn-down follows the current month.
Amounts from accounts in another currency are converted to your base currency with the exchange rate of each transaction’s date. A transaction whose currency has no rate for its date is left out of the totals rather than counted at face value, and a notice above the charts names the currencies concerned.
You can adjust what they show:
- Choose the period they cover using the preset buttons (1M/3M/6M/YTD/1Y/3Y/All) or by typing a custom start/end date – the same period selector used on the main Charts page. It applies to every tab except Compare periods, which has its own period buttons.
- Narrow every chart and the summary cards above to one or more specific accounts using the account filter next to the period selector – leaving it empty includes all accounts. Like the period selector, it does not apply to the Compare periods tab, which always covers all your accounts.
- On the spending heatmap tab, a category filter appears next to the account filter. Open the category picker and tick several categories: ticking a category includes its subcategories, and the Uncategorized entry picks transactions without a category. A search box narrows the list. With nothing selected, all categories count. The filter changes only the heatmap, its CSV download and its text summary, never the other charts. On this tab the Total income, Total expenses and Net cards add up the same transactions as the grid, so they follow the filter and also leave out transfers and excluded categories. As in the transactions list, a split transaction counts whole when one of its lines is in a selected category. Transfers and expenses in categories marked to be left out of spending are not shown in the spending heatmap, so its totals can be lower than those of the other charts for the same period.
Comparing two periods
Section titled “Comparing two periods”The Compare periods tab compares what you spent in two periods, in your base currency. Choose This month vs last month, Last 30 days vs the 30 before or This year vs last year. A period that is not over yet (this month, this year) is compared with the same days of the previous one, and the page says so and states both date ranges.
Choose Custom periods to compare any two date ranges: enter the start and end of the current period and of the comparison period, then press Compare. Each period must end on or after its start and last at most five years; the periods may overlap or come in any order, and the page says so when they cannot be compared.
A summary line gives the total spent in each period and the change.
Under the summary, Notable changes lists the categories that changed most: up to five increases and up to five decreases. A category is listed when it changed by a large amount (at least 20 in your base currency, or 5% of what you spent in the current period if that is more) and by at least 20%, or when it is new or gone. Each entry says whether it is an increase, a decrease, new or gone, and gives the change and the amounts before and after. The list works on whole categories, not subcategories.
Under the list, a chart of the biggest movers shows up to ten categories, those with the largest change. A bar to the right of the zero line is a category where you spent more and a bar to the left one where you spent less; each bar ends in its amount, and the legend names the two sides so the colours are never the only clue. Hover or focus a bar to see the amounts of both periods. Choose Table above the chart to read the same categories as a table. A screen reader reads a summary of the chart, and the table gives every figure. Amounts are hidden when privacy mode is on. Nothing in the comparison can be exported.
The table below gives, for each category, the amount in each period, the change in amount and in percent, and its share of the current total. New marks a category with no spending in the comparison period, and Gone one that you spent on then but not now. The change always shows its sign and an arrow, with red meaning you spent more and green less.
A category with spending on subcategories has a button to show them, and the rest of its spending shows as Without subcategory. Click a column header, or press Enter or Space on it, to sort by it, and click again to reverse; the page opens in the order of the largest change. A notice names the currencies left out for lack of an exchange rate. With a very large number of categories the table shows the 250 that changed most and says so, while the totals count all of them.
Spending is counted as in the spending heatmap: expenses only, converted at each transaction’s date rate, without transfers, off-budget accounts or categories left out of spending. A split transaction counts through its lines, each in its own category, and expenses with no category appear as Uncategorized.
The tab has its own period buttons: it ignores the page’s period selector and account filter, which are hidden on it, and it compares all your accounts. Open it directly with ?tab=compare.